

Are you looking for simple ways to improve visual learning? Understanding how to use snipping tool on windows instantly streamlines materials, boosts comprehension, and creates a highly focused classroom environment.
This comprehensive guide explores everything about capturing the perfect screenshot. We cover essential keyboard shortcuts, diverse capture modes, expert annotation tips, and proven strategies to reduce cognitive overload. You will learn to build clearer, highly engaging educational materials that support a calm, structured digital learning environment for every student.
Why Learning How to Use Snipping Tool on Windows Matters in Education

Visual aids remain one of the most powerful instruments in any teacher’s pedagogical arsenal. When you capture specific, targeted parts of a screen rather than sharing a cluttered, chaotic full-screen view, you actively help students direct their attention exactly where it needs to be. This highly targeted approach transforms disorganized digital lessons into calm, structured learning experiences that benefit everyone involved in the educational process.
Knowing how to use snipping tool on windows is not just a technical skill; it is a foundational communication strategy. In a landscape where educators constantly battle for student attention, delivering concise visual information is paramount.
Reducing Cognitive Overload in the Digital Classroom
Modern students face endless digital distractions on a daily basis. A computer screen full of multiple software windows, a dozen browser tabs, and complex user interfaces can easily overwhelm a learner’s working memory. By mastering how to use snipping tool on windows, you can expertly isolate key information and remove the surrounding noise.
Whether you want to highlight a specific algebraic equation, zoom in on a topographical map of South America, or showcase a single compelling paragraph from a primary historical document, removing unnecessary background clutter significantly reduces cognitive overload. You can easily integrate these focused, bite-sized images into your digital classroom management software, ensuring students see only what matters most to the current lesson objective. Clear, purposeful visuals prevent confusion, leading to calmer students, fewer repetitive questions, and much more effective independent study sessions.
Enhancing Visual Communication for Diverse Learners
Sometimes, written text instructions are simply not enough to convey complex digital tasks. Showing a student exactly where to click, what a specific menu looks like, or what a finished digital project should look like bridges the vast gap between abstract concepts and practical application. Capturing precise, well-cropped screenshots allows educators to build step-by-step guides that are universally understood.
This visual approach is incredibly beneficial for English Language Learners (ELL) and students with different cognitive processing needs. When you rely on images to guide instruction, you bypass language barriers and reading comprehension hurdles, allowing the student to focus entirely on the task at hand.
Fostering Independent Learning and Confidence
When students have access to clear visual guides, they become more self-reliant. Instead of raising their hand to ask how to submit an assignment for the fifth time, they can reference a quick visual checklist you created. Understanding how to use snipping tool on windows empowers you to build these confidence-boosting resources in mere seconds. Over time, this fosters a classroom culture of independence, where students feel capable of troubleshooting their own minor technical issues.
Comprehensive Step-by-Step Guide: How to Use Snipping Tool on Windows
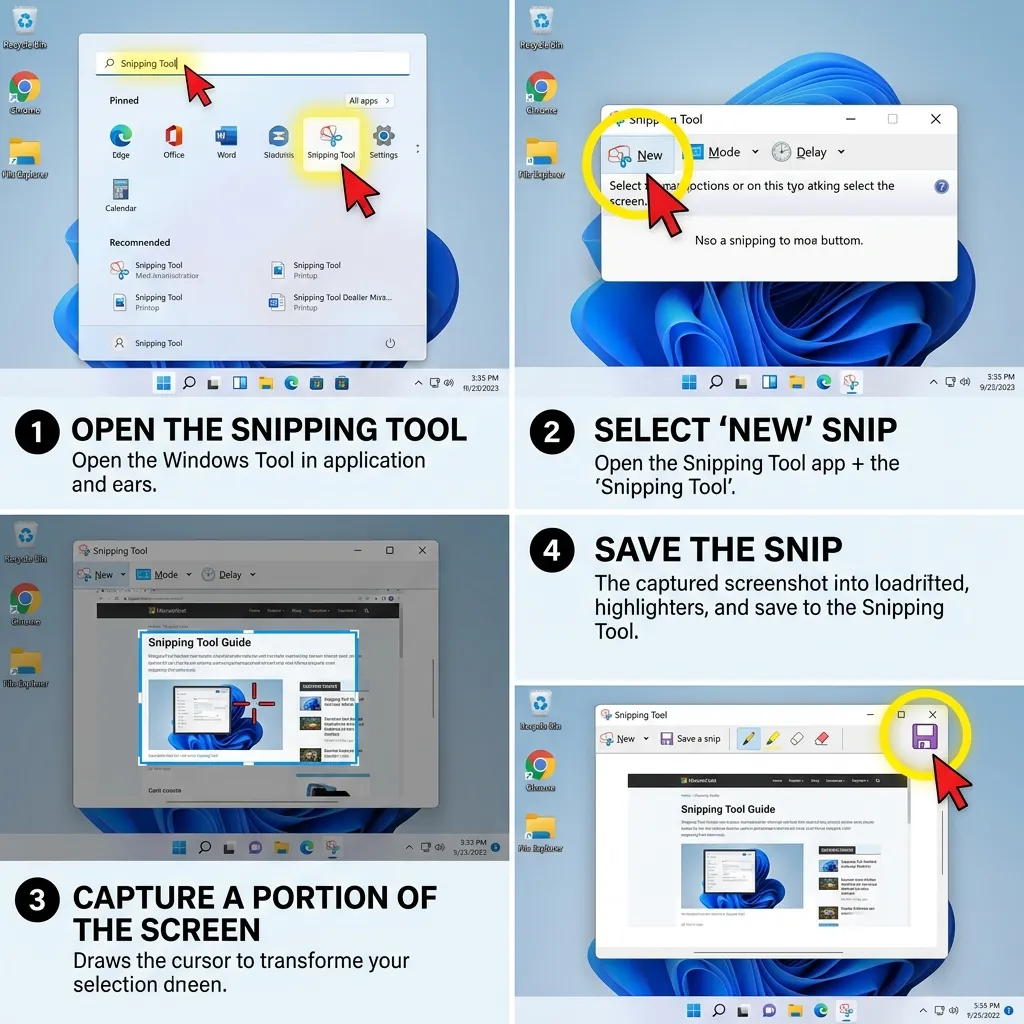
Creating high-quality, professional educational materials starts with mastering the technical steps. Microsoft Windows provides several intuitive, frictionless ways to access and utilize this powerful built-in feature.
Launching the Application Efficiently
Time is the most precious resource a teacher has. You have a few lightning-fast methods to launch the application without disrupting your instructional flow:
- Use the Windows search bar: Press the Start button on your keyboard, type the application name into the search field, and select it from the top results.
- Master the keyboard shortcut: Press the Windows logo key + Shift + S simultaneously. This instantly dims your entire screen and brings up the capture overlay at the top of your monitor. This is the absolute best method, saving you valuable time during a live lesson or screen-sharing session.
- Pin it to your taskbar: For frequent, daily access, right-click the application icon while it is open and select the option to pin it to your taskbar. This keeps the tool just one click away at all times.
- Use the Print Screen key: In modern versions of Windows 11, pressing the PrtSc key can automatically trigger the capture overlay, bypassing the need for a three-key combination.
Mastering the Four Primary Capture Modes
Different educational scenarios naturally require different types of screenshots. The application offers multiple specialized modes to suit your exact instructional needs:
- Rectangle Mode: Drag your mouse cursor to form a precise, structured box around a chart, an image, or a specific text block. This is the default and most commonly used mode for creating standard lesson materials.
- Window Mode: Capture an entire dialog box, a calculator app, or a web browser window without grabbing your messy desktop background. Simply hover over the window you want, and it will highlight automatically.
- Full Screen Mode: Take a snapshot of your entire display in one click. This is useful when you need to show the overall layout of a software program or a dashboard.
- Freeform Mode: Draw an organic, customized shape around a specific object. This is perfect for isolating complex diagrams or grabbing irregularly shaped graphics without including the white space around them.
Selecting the absolute right mode for your specific task helps you implement highly effective student engagement strategies by varying how information is presented and consumed.
Advanced Capabilities: Video Snipping and OCR Text Extraction
Recent updates to the Windows operating system have transformed this utility from a simple image grabber into a robust multimedia powerhouse. Learning how to use snipping tool on windows now means mastering video and text features as well.
Recording Video Snips
You are no longer limited to static images. By selecting the video camera icon in the toolbar, you can record a specific region of your screen. This is a game-changer for educators. You can record a 30-second video showing exactly how to format a digital essay or how to use a specific math simulation website. You can even capture your system audio and microphone, allowing you to narrate the steps as you record. Once finished, you can seamlessly edit the footage in Microsoft Clipchamp to add captions.
Extracting Text with OCR
Have you ever found a great quote in a locked PDF or a digital image, and wished you could copy the text without retyping it? The new Text Actions feature utilizes Optical Character Recognition (OCR) to solve this. After taking a screenshot of a document, click the Text Actions button. The software analyzes the image and allows you to copy all visible text directly to your clipboard. It even features a Quick Redact option to automatically black out sensitive information like email addresses and phone numbers, which is crucial for maintaining student privacy.
Expert Insights and Pro Tips for Educators
To get the absolute most out of your screen captures and elevate your teaching materials, consider these advanced strategies used by experienced instructional designers and technologists.
- Utilize the Built-In Delay Feature: If you need to capture a drop-down menu or a specific mouse hover effect that disappears when you click away, use the delay function. Set a 3 to 5-second timer, click New, open your specific menu, and wait. The screen will freeze perfectly, allowing you to capture transient interface elements.
- Annotate with Clear Purpose: Use the built-in pen and highlighter tools to draw attention, but do so strategically. Draw arrows to point out navigation buttons, circle important numerical figures in a data set, or highlight key vocabulary words in a reading passage.
- Leverage the Eraser for Cleanliness: Keep your annotations incredibly neat. If you draw a messy circle with your mouse, do not leave it. Use the eraser tool to remove the sloppy ink and try again. Clean, professional visuals maintain a calm aesthetic and establish your authority as an educator.
- Copy Directly to Clipboard to Save Time: If you are actively building a presentation or a worksheet, you do not always need to save every single image as an individual file. Simply let the tool copy the capture to your clipboard automatically, and paste it directly into your slides or documents.
- Edit in Paint for Advanced Needs: If you need to add typed text boxes or perfect geometric shapes (like perfect circles or straight arrows), click the option to edit your snip in Paint or Paint 3D.
For more advanced educational technology practices and deeper insights, you can review comprehensive resources from the International Society for Technology in Education to see exactly how visual learning positively impacts long-term student outcomes.
Common Mistakes to Avoid When Capturing Screens
Even seasoned educational professionals make errors when creating visual guides. Avoid these incredibly common pitfalls to keep your materials looking authoritative, clean, and distraction-free.
- Capturing Unrelated Personal Information: Always double-check your screen before capturing. Ensure no private emails, sensitive student grades, personal desktop wallpapers, or unrelated browser tabs are visible in the background frame. Privacy is paramount in education.
- Over-Annotating and Creating Visual Noise: Adding too many overlapping arrows, dense text boxes, and overly bright highlighter colors can easily create massive visual noise. This defeats the purpose of the screenshot. Stick to one or two minimal annotations per image to maintain intense focus.
- Ignoring Image Resolution and Aspect Ratios: If you capture a very small, pixelated area and stretch it to fit a massive presentation slide, the image will become blurry and completely unreadable. Always capture the source material at the largest possible size (zoom in on your web browser first) before taking the screenshot.
- Forgetting to Save Crucial Files: If you are working on a massive, multi-page study guide and relying solely on the temporary clipboard, you might lose your image if you accidentally copy text or another image. Save crucial, hard-to-capture images to a dedicated, clearly labeled folder on your hard drive.
- Failing to Crop Properly: Leaving massive borders of empty white space or irrelevant website sidebars around your core subject matter distracts the eye. Always crop tightly around the specific information you want the student to internalize.
Built-In Capture vs. Third-Party Screen Capture Apps
Educators and school administrators often wonder if they need to purchase expensive, premium software to create great lesson materials. Let us do a deep dive and compare the native Windows tool with premium alternatives available on the market.
|
Feature Comparison |
Built-In Windows Tool |
Premium Third-Party Tools |
|---|---|---|
|
Financial Cost |
100% Free (Included with OS) |
Often requires a costly monthly subscription |
|
Ease of Use & Adoption |
Very intuitive, minimal learning curve |
Can be complex with overwhelming, bloated features |
|
Annotation Capabilities |
Basic (Pen, Highlighter, Crop, Ruler) |
Advanced (Shapes, Blur, Stamps, Typed Text, Magnify) |
|
Video Recording |
Basic video snip capabilities with audio |
Advanced multi-track editing and audio mixing |
|
System Performance Impact |
Extremely lightweight, instant launch |
Can significantly slow down older classroom computers |
|
Cloud Integration |
Basic sharing to local apps |
Direct uploads to proprietary cloud hosting |
For the vast majority of teaching applications, mastering how to use snipping tool on windows provides more than enough functionality while keeping your daily workflow simple, efficient, and entirely cost-effective. You can seamlessly integrate these high-quality images into your lesson planning frameworks without ever needing to request a budget approval for new, complex software licenses.
Integrating Visuals for a Calm, Predictable Learning Environment

When students know exactly what is expected of them and how to accomplish it, their anxiety drops significantly and their academic focus increases dramatically. Integrating well-cropped, clearly annotated images into your daily assignments creates a highly predictable, easy-to-navigate learning environment.
Start by creating a comprehensive visual glossary for your digital classroom ecosystem. Whenever you introduce a completely new software tool, a math simulation, or a research website to your students, provide a one-page digital reference sheet. Fill this sheet with clear screenshots pointing out the login button, the specific assignment tab, and the final submit button. This proactive, empathetic approach eliminates repetitive questions and actively empowers students to work independently at their own pace.
Additionally, consider using targeted screenshots to provide highly personalized, constructive feedback. Instead of typing out a long, confusing paragraph explaining exactly where a student went wrong in a digital design project or a coding assignment, take a quick snapshot of their work. Circle the specific error with the red pen tool, and leave a brief, encouraging note. This specific method is highly effective, incredibly compassionate, and saves you countless hours of exhausting grading time.
By fully embracing these incredibly simple visual communication strategies, you actively foster a deep sense of tranquility and order in your educational space. The technology itself essentially becomes invisible, allowing the actual academic learning to take center stage.
Conclusion
Creating clear, authoritative, and completely distraction-free educational materials is much easier than you might think. Now that you fully understand how to use snipping tool on windows, you can instantly improve your digital lesson plans, heavily reduce student anxiety, and communicate incredibly complex ideas with absolute ease. Start capturing your screen strategically today and watch your classroom transform into a much more focused, engaging, and successful environment!
FAQs
What is the fastest, most efficient way to take a precise screenshot during a live lesson?
The absolute most efficient method is to press the Windows logo key + Shift + S on your keyboard. This shortcut instantly darkens your screen and opens the capture menu right at the top of your monitor, allowing you to select your desired area immediately without having to search for and open the full desktop application first. It is perfect for fast-paced classroom environments.
Where do my captured images actually go after I take them?
By default, when you use the keyboard shortcut method, the image is instantly copied directly to your computer’s temporary clipboard. You can paste it into a Word document or a PowerPoint presentation immediately using Ctrl + V. Additionally, modern Windows systems automatically save a permanent copy to a dedicated “Screenshots” folder located within your system’s default Pictures directory.
Can I thoroughly edit and markup the image immediately after capturing it?
Yes. Once you make a screen capture, a small notification banner usually appears in the bottom right corner of your display. Clicking this specific notification immediately opens the image in a dedicated editing window. Here, you can utilize digital pens, highlighters, rulers, and cropping features to markup the image perfectly before saving it or sharing it with your students.
How do I capture a drop-down menu that instantly disappears when I click away?
To capture transient, temporary elements like hover menus or tooltips, open the main application window and look for the specific Delay function (often represented by a small clock or hourglass icon). Set it to a 3 or 5-second delay, click New, and quickly navigate to open your drop-down menu. The entire screen will freeze perfectly when the background timer runs out, allowing an easy capture.
Is it actually possible to record live video with this native Windows application?
Yes, recent major updates to the Windows 11 operating system have introduced excellent, basic screen recording capabilities within the exact same user interface. You simply select the video camera icon at the top instead of the standard photo camera icon. You can then highlight a specific region of your display, hit record, and even capture your microphone audio to narrate a quick digital lesson.
Can I draw perfect geometric circles or perfectly straight lines when annotating for a math class?
The native application primarily features freehand drawing tools which mimic a real marker. While it does have a digital ruler and protractor tool in newer versions to help you draw perfectly straight lines and specific angles, perfect geometric shapes are slightly harder to achieve. For perfect shapes, it is recommended to click “Edit in Paint” directly from the toolbar.
How do I capture an entire, incredibly long scrolling webpage for a reading assignment?
The built-in Windows application does not currently support continuous scrolling screenshots natively. To capture an entire, lengthy webpage that extends far below the visible fold, you will need to either take multiple overlapping screenshots and piece them together, or utilize a specialized browser extension designed specifically for full-page captures.
Why is my captured image incredibly blurry and pixelated when I paste it into my digital presentation?
Blurriness usually occurs because a very small image on your screen is being artificially stretched to fit a much larger space on your presentation slide. To completely prevent this resolution loss, ensure the original content on your screen is displayed as large as possible (use your browser’s zoom function if necessary) before actively taking the screenshot.
Can I magically extract written text from a screenshot of a locked document?
Yes, in the absolute latest Windows 11 updates, there are powerful Optical Character Recognition (OCR) features officially called Text Actions. You can simply click this dedicated button in the toolbar to automatically copy all text visible in your screenshot. It is an incredible time-saver for educators who need to lift quotes from scanned historical documents or locked PDF files.
How do I completely disable the pop-up notification banner after taking a snip if it distracts my students?
If you find the pop-up notifications visually distracting while projecting your screen to the class, you can easily turn them off. Go directly to your main Windows system Settings, navigate to the System menu, then select Notifications. Scroll down the list of apps and toggle off the notifications specifically designated for the Snipping Tool application.